excelbat's blog

每天code一点点

  • 首页
  • 标签
  • 归档

tradingview 筛选币种通过油猴通知

发表于 2023-07-12 | 分类于 脚本 | 评论数: | 阅读次数:

筛选币种警报

本文介绍了如何使用油猴脚本和Chrome通知,来检测tradingview筛选器表格中的行数,并在特定条件下进行警告。

问题描述

我们需要在 https://cn.tradingview.com/crypto-coins-screener/ 筛选

首先,我们需要用tradingview 筛选器功能筛选出,涨跌幅比较大的币种

  • 筛选24h涨跌幅较大的币种
  • 筛选评级小于150的币种

接下来,我们需要通过油猴脚本,探测页面,找出满足条件的币种,并在满足以下条件时触发警告

  • 表格中的行数大于1
  • 触发chrome通知

实现步骤

  1. 首先,我们需要使用油猴脚本管理器来运行自定义脚本。确保已安装并启用油猴脚本管理器。

  2. 创建一个油猴脚本,并指定脚本的名称、命名空间和描述信息。

1
2
3
4
5
6
7
8
9
10
11
12
13
14
15
16
17
18
19
20
21
22
23
24
25
26
27
28
29
30
31
32
33
34
35
36
37
38
39
40
41
42
43
44
45
// ==UserScript==
// @name 检测表格行数
// @namespace your-namespace
// @version 1.0
// @description 检测表格行数示例脚本
// @match https://cn.tradingview.com/crypto-coins-screener/
// @grant none
// ==/UserScript==
(function() {
'use strict';

// 定时执行检测逻辑
setInterval(checkTableContent, 10000);

function checkTableContent() {
// 查找表格中的tr元素
const tableRows = document.querySelectorAll('#js-screener-container table tbody tr');

// 判断tr元素数量是否大于 1
if (tableRows.length > 1) {
// 使用Chrome通知弹出
showNotification('出现涨跌较大的币种!');
}
}

function showNotification(message) {
if (Notification.permission !== 'granted') {
// 请求通知权限
Notification.requestPermission();
} else {
// 弹出通知
const notification = new Notification('警告', {
body: message,
icon: 'https://github.com/tangly1024/NotionNext/blob/main/docs/theme-medium.png' // 替换为自定义图标URL
});

// 点击通知时打开页面
notification.onclick = function() {
window.focus();
notification.close();
};
}
}

})();

保存脚本并将其导入到油猴脚本管理器中,并确保在 https://cn.tradingview.com/crypto-coins-screener/ 页面上运行该脚本。

现在,每隔5秒,脚本将检查表格中的行数和行内容,如果行数大于1,将弹出Chrome通知进行警告。

总结

通过油猴脚本和Chrome通知的结合,我们可以实现在网页中检测表格行数的功能,并根据特定条件进行警告。这种技术可以应用于各种场景,帮助我们实时监测和处理特定页面上的数据变化。

希望本文对您有所帮助!如有任何疑问,请随时提问。

pycharm 导入Auto-GPT(墙内)

发表于 2023-04-15 | 分类于 编程, 人工智能 | 评论数: | 阅读次数:

引言

AutoGPT 是让 GPT-4 自动化的驱动,通过设定5个目标,自动搜索数据并喂给GPT,同时分析返回结果。

准备工作

在接入 AutoGPT 之前,你需要完成以下几个步骤:

  1. 安装 PyCharm
  2. 科学上网:clash
1
pip install openai-autogpt

安装Auto-GPT

  • 打开终端执行
1
git clone https://github.com/Torantulino/Auto-GPT
  • 打开pycharm 导入项目
  • 将.env.template 重命名为 .env

  • 修改.env 的配置文件

1
2
3
OPENAI_API_KEY=  #获取地址 https://platform.openai.com/
PINECONE_API_KEY= #获取地址 https://www.pinecone.io
GOOGLE_API_KEY= #获取地址 请参考 https://zhuanlan.zhihu.com/p/621746507

关键 设置代理

    • 打开 tiktoken 下面的load.py ,然后修改 read_file 方法,增加代理
1
2
3
4
5
6
7
8
9
10
11
12
13
14
15
16
def read_file(blobpath: str) -> bytes:
if not blobpath.startswith("http://") and not blobpath.startswith("https://"):
try:
import blobfile
except ImportError:
raise ImportError(
"blobfile is not installed. Please install it by running `pip install blobfile`."
)
with blobfile.BlobFile(blobpath, "rb") as f:
return f.read()
# avoiding blobfile for public files helps avoid auth issues, like MFA prompts
proxies = {
'http': 'http://127.0.0.1:7890',
'https': 'http://127.0.0.1:7890'
}
return requests.get(blobpath, proxies=proxies).content
    • 打开 openai 下面的 api_requestor.py,修改 request_raw 方法为
1
2
3
4
5
6
7
8
9
10
11
12
13
14
15
16
17
18
19
20
21
22
23
24
25
26
27
28
29
30
31
32
33
34
35
36
37
38
39
40
41
42
43
44
45
46
47
48
49
50
51
52
53
54
def request_raw(
self,
method,
url,
*,
params=None,
supplied_headers: Optional[Dict[str, str]] = None,
files=None,
stream: bool = False,
request_id: Optional[str] = None,
request_timeout: Optional[Union[float, Tuple[float, float]]] = None,
) -> requests.Response:
abs_url, headers, data = self._prepare_request_raw(
url, supplied_headers, method, params, files, request_id
)

if not hasattr(_thread_context, "session"):
_thread_context.session = _make_session()

try:
proxies = {
'http': 'http://127.0.0.1:7890',
'https': 'http://127.0.0.1:7890'
}

result = _thread_context.session.request(
method,
abs_url,
headers=headers,
data=data,
files=files,
stream=stream,
proxies=proxies,
timeout=request_timeout if request_timeout else TIMEOUT_SECS,
)
except requests.exceptions.Timeout as e:
raise error.Timeout("Request timed out: {}".format(e)) from e
except requests.exceptions.RequestException as e:
raise error.APIConnectionError(
"Error communicating with OpenAI: {}".format(e)
) from e
util.log_debug(
"OpenAI API response",
path=abs_url,
response_code=result.status_code,
processing_ms=result.headers.get("OpenAI-Processing-Ms"),
request_id=result.headers.get("X-Request-Id"),
)
# Don't read the whole stream for debug logging unless necessary.
if openai.log == "debug":
util.log_debug(
"API response body", body=result.content, headers=result.headers
)
return result

最后

展示一下成果

PS:之后在遇到问题,请直接问 gpt-4

题外话

最近ai 特别火,拿Stable-Diffusion 创作一副,其他的太过XX,就不放了

有道云笔记markdown 体验

发表于 2019-05-22 | 评论数: | 阅读次数:

SSL 在tcp socket中应用及优化

发表于 2019-04-15 | 更新于 2019-04-16 | 分类于 问题定位 | 评论数: | 阅读次数:

写在前面的话


在rpc 通信过程中,往往使用nio channel
完成通信,如果想获取一个安全的信道,需要使用SSL/TLS。接下来我们从socket出发,然后在简要介绍nio的ssl使用以及常见问题处理。

socket ssl 使用

首先,我们先查看未使用安全套接字的通信

  • server 端实现:

    import java.io.*;
    import java.net.*;
    
    . . .
    
    int port = availablePortNumber;
    
    ServerSocket s;
    
    try {
        s = new ServerSocket(port);
        Socket c = s.accept();
    
        OutputStream out = c.getOutputStream();
        InputStream in = c.getInputStream();
    
        // Send messages to the client through
        // the OutputStream
        // Receive messages from the client
        // through the InputStream
    }
    
    catch (IOException e) {
    }
  • client 端实现;

    import java.io.*;
    import java.net.*;
    
    . . .
    
    int port = availablePortNumber;
    String host = "hostname";
    
    try {
        s = new Socket(host, port);
    
        OutputStream out = s.getOutputStream();
        InputStream in = s.getInputStream();
    
        // Send messages to the server through
        // the OutputStream
        // Receive messages from the server
        // through the InputStream
    }
    
    catch (IOException e) {
    }

    接着,我们看下ssl加密的代码

  • server 端:

    import java.io.*;
    import javax.net.ssl.*;
    
    . . .
    
    int port = availablePortNumber;
    
    SSLServerSocket s;
    
    try {
        SSLServerSocketFactory sslSrvFact =
            (SSLServerSocketFactory)
            SSLServerSocketFactory.getDefault();
        s =(SSLServerSocket)sslSrvFact.createServerSocket(port);
    
        SSLSocket c = (SSLSocket)s.accept();
    
        OutputStream out = c.getOutputStream();
        InputStream in = c.getInputStream();
    
        // Send messages to the client through
        // the OutputStream
        // Receive messages from the client
        // through the InputStream
    }
    
    catch (IOException e) {
    }
  • client 端:

    import java.io.*;
    import javax.net.ssl.*;
    
    . . .
    
    int port = availablePortNumber;
    String host = "hostname";
    
    try {
        SSLSocketFactory sslFact =
          (SSLSocketFactory)SSLSocketFactory.getDefault();
        SSLSocket s =
          (SSLSocket)sslFact.createSocket(host, port);
    
        OutputStream out = s.getOutputStream();
        InputStream in = s.getInputStream();
    
        // Send messages to the server through
        // the OutputStream
        // Receive messages from the server
        // through the InputStream
    }
    
    catch (IOException e) {
    }

简单来看,并没有太多的改动,使用参考网上的示例跑了,需要导入证书。 使用keytool
生成的证书。

至此,建立完链接,接下来我们通过wireshark来分析ssl 数据包:

从图中不难看出handshake 过程:

  1. ClientHello – 客户端发送所支持的 SSL/TLS 最高协议版本号和所支持的加密算法集合及压缩方法集合等信息给服务器端。

  2. ServerHello – 服务器端收到客户端信息后,选定双方都能够支持的 SSL/TLS
    协议版本和加密方法及压缩方法,返回给客户端。

  3. (可选) SendCertificate – 服务器端发送服务端证书给客户端。

  4. (可选)RequestCertificate –
    如果选择双向验证,服务器端向客户端请求客户端证书。

  5. ServerHelloDone – 服务器端通知客户端初始协商结束。

  6. (可选) ResponseCertificate –
    如果选择双向验证,客户端向服务器端发送客户端证书。

  7. ClientKeyExchange –
    客户端使用服务器端的公钥,对客户端公钥和密钥种子进行加密,再发送给服务器端。

  8. (可选) CertificateVerify –
    如果选择双向验证,客户端用本地私钥生成数字签名,并发送给服务器端,让其通过收到的客户端公钥进行身份验证。

  9. CreateSecretKey – 通讯双方基于密钥种子等信息生成通讯密钥。

  10. ChangeCipherSpec – 客户端通知服务器端已将通讯方式切换到加密模式。

  11. Finished – 客户端做好加密通讯的准备。

  12. ChangeCipherSpec – 服务器端通知客户端已将通讯方式切换到加密模式。

  13. Finished – 服务器做好加密通讯的准备。

  14. Encrypted/DecryptedData –
    双方使用客户端密钥,通过对称加密算法对通讯内容进行加密。

  15. ClosedConnection – 通讯结束后,任何一方发出断开 SSL 连接的消息。

我们可以看到步骤2:

Server Hello 过程会带着握手的加密套件来回应

常见问题:

1
2
3
Waiting for connection... 
javax.net.ssl.SSLHandshakeException: no cipher suites in common
Waiting for connection...

解决方式:生成公私

Runtime Exception: No Cipher Suites in Common Problem 1: When
handshaking, the client and/or server throw this exception.

Cause 1: Both sides of an SSL connection must agree on a common
ciphersuite. If the intersection of the client’s ciphersuite set with
the server’s ciphersuite set is empty, then you will see this exception.

Solution 1: Configure the enabled cipher suites to include common
ciphersuites, and be sure to provide an appropriate keyEntry for
asymmetric ciphersuites. (See Exception, “No available certificate…”
in this section.)

Problem 2: When using Netscape Navigator or Microsoft Internet Explorer
(IE) to access files on a server that only has DSA-based certificates, a
runtime exception occurs indicating that there are no cipher suites in
common.

Cause 2: By default, keyEntries created with keytool use DSA public
keys. If only DSA keyEntries exist in the keystore, only DSA-based
ciphersuites can be used. By default, Navigator and IE send only
RSA-based ciphersuites. Since the intersection of client and server
ciphersuite sets is empty, this exception is thrown.

Solution 2: To interact with Navigator or IE, you should create
certificates that use RSA-based keys. To do this, you need to specify
the -keyalg RSA option when using keytool. For example:

keytool -genkey -alias duke -keystore testkeys -keyalg rsa

NIO 中 SSL 使用,设置使用加密套件

1
2
3
4
5
if (supportedCipherSuitesWithEncryption == null) {
cipherSuites =Arrays.stream(supportedCipherSuites).filter(s -> s.contains("256")).collect(Collectors.toList());

}
sslEngine.setEnabledCipherSuites(supportedCipherSuites);

最后遇到的问题,设置加密套件不生效:

保证设置加密套件的逻辑是在handshake 之前就可以。

参考

  1. https://docs.oracle.com/javase/1.5.0/docs/guide/security/jsse/JSSERefGuide.html#NoSSLSocket
  2. https://blog.csdn.net/loganyang123/article/details/45567825 ssl
    socket 示例

休息一下

apue 疑难概念解析-前五章

发表于 2019-03-15 | 分类于 基础知识 | 评论数: | 阅读次数:

开篇废话


最近在看apue,把书中的代码详细的敲了一遍,并上传至了github,https://github.com/excel-bat/apuebegin,部分概念参照了网上的结果。

疑难概念


  • chapter 4

    1. 文件权限位中特殊权限位:set_UID 和 set_GID 其实可以理解为设置用户所属者信息

      1
      2
      3
      4
      5
      6
      7
      8
      9
      10
      11
      12
      13
      14
      15
      16
      17
      18
      19
      20
      21
      22
      23
      24
      25
      26
      27
      28
      #include <unistd.h> // chown
      #include <stdio.h> // printf, perror

      #define ROOT_UID 0
      #define ROOT_GID 0

      int main(int argc, char *argv[]) {

      // 1)

      if (argc != 2) {
      printf("usage: ./a.out filepath");
      return 1;
      }

      // 2)

      char *filepath = argv[1];

      if (chown(filepath, ROOT_UID, ROOT_GID) == -1) {
      perror("Change owner fail");
      return 2;
      }

      // 3)

      return 0;
      }

      修改权限

      1
      2
      3
      4
      5
      6
      7
      8
      9
      10
      $ ls -l /tmp/ttt
      -rw-rw-r-- 1 xxx xxx 0 1月 24 10:27 /tmp/ttt

      $ ./a.out /tmp/ttt
      Change owner fail: Operation not permitted

      $ sudo ./a.out /tmp/ttt

      $ ls -l /tmp/ttt
      -rw-rw-r-- 1 root root 0 1月 24 10:27 /tmp/ttt

      其中 最后一行 ,root 就是特殊权限位

      -rw-rw-r– 1 root root 0 1月 24 10:27 /tmp/ttt

    2. umask 函数,文件权限掩码(权限屏蔽位),说白了就是原有权限减去umask值得到的就是真实的权限位。

引发线程cpu占用率持续飙升的根因分析

发表于 2019-03-13 | 分类于 系统分析 | 评论数: | 阅读次数:

安利一下


在最近系统性能调优的过程中,用到了很多工具,由于笔者开发的主要是java应用,从linux
工具到jdk工具,以及全链路追踪工具,都解决了相当多的问题,而完全面向java应用的的工具,笔者墙裂推荐
阿里的arthas,这款工具简单,简单到分析cpu、内存问题分分钟就能找到些蛛丝马迹。

问题抽象


项目最近做了一次大升级,压测后发现项目跑了24小时后,开始出现某个线程cpu占用100%,如下图所示:

重启后,仔细观察该线程,发现线程cpu使用率在逐渐递增,我们通过jvisualvm,快速的找到了问题的堆栈,发现是某个redis操作,这个操作里面调用了lua脚本,并使用了evalsha()的方式执行。

抽丝剥茧


从现象我们理所当然的想到了,会不会是redis集群慢了,拖垮了整个项目,通过redis
monitor 发现单次请求响应变化不大,并且redis cpu 占用率属于正常。使用perf命令记录如下:

然后开始想,既然占用cpu 多,那就把方法时间打出来吧,通过log的方式记录下来,发下每千次调用的平均时间是毫秒级,而且稳定不会递增。
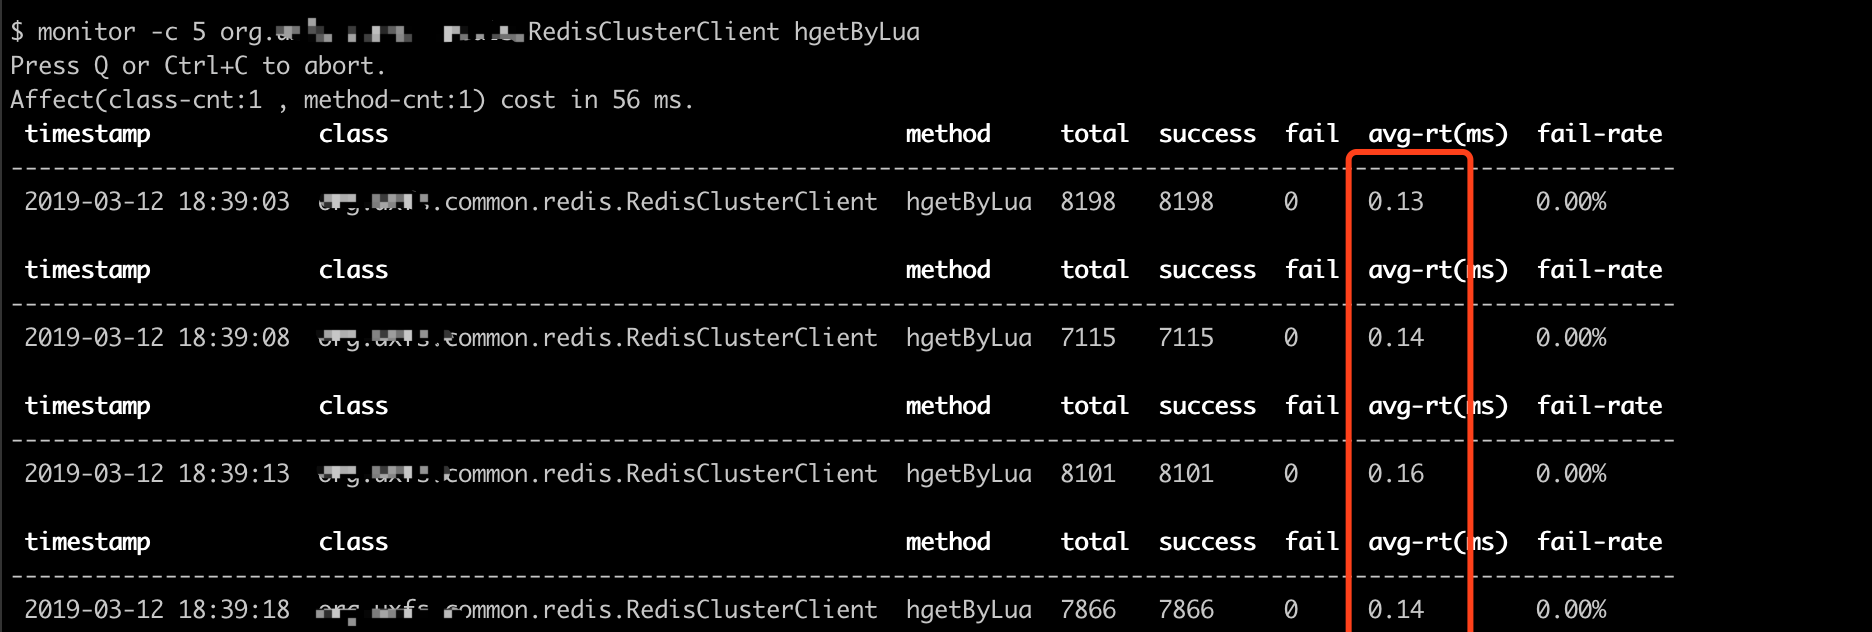
这个时候又没了思路,用arthas 开始记录该方法的耗时,一行命令就记录如下,每5s记录一次平均时间,而且不用改代码,这可是福音啊

基本跟log一致,然后开始使用 thread -n 3 -i 1000
发现另外一个线程,然后同样执行monitor,发现该方法单位时间内的调用次数在增加,什么情况,方法调用难道写了个循环么,打开代码一看,外层调用并没有循环。。。
但是发现方法内存在循环,该循环是从set集合里取数据并判断该数据是否合法,合法就从set中移除,并break循环,看起来貌似没有任何问题。直觉告诉我,这个set会不会过大呢,这个set是用枚举单例的成员变量,想要打印这个变量里面的数据,放在以前打印log,又是一段代码,而且查看起来特别费劲,这个时候,我们又祭出神器,arthas的ognl命令。非常给力

ognl ‘@xxx.common.redis.collections.UniqConcurrentSet@INSTANCE.dataIsNullSet‘
ognl ‘@xxx.common.redis.collections.UniqConcurrentSet@INSTANCE.dataIsNullSet.size()’

结果这个set都37w
条数据了,而且还在持续上升,但是占用内存很小,单行记录80B左右,总体不到50M,原来真正导致cpu上升的元凶就是数据量大了后,遍历耗时了,定位到了原因,接着及时删除数据,cpu平稳了

那今天先聊到这,休息下眼睛
{% asset_img meizi.jpg 妹纸图 %}

文件系统FUSE开发实践

发表于 2019-03-07 | 分类于 基础知识 | 评论数: | 阅读次数:

预热


最近一直在优化分布式文件系统的性能,学习了linux内核文件系统的函数,了解到linux一切皆文件,
除了常见的文件、目录还有socket(可查阅apue
第四章内容),那这些文件的管理都离不开VFS(虚拟文件系统),linux支持ext、ext2
xfs等多种文件系统
,那都是依赖于统一的文件操作界面,底层采用链表的方式,将不同的文件系统链接。打个比方,linux内核就像一个工厂,而VFS是模板,而某一个文件系统就是根据模板生成的产品
。FUSE(filesystem in user
space)用户态文件系统是介于VFS和用户自定义文件系统的枢纽。

FUSE文件系统实现


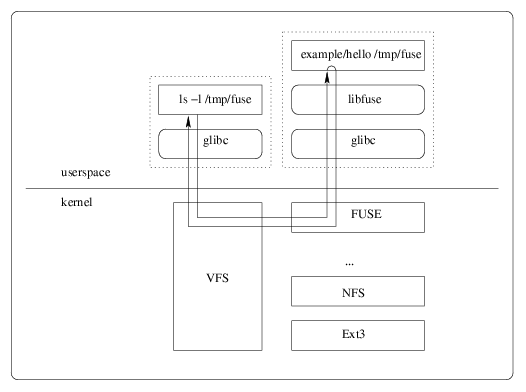
为了让大家有个直观的认识,我们先看下图:

上图可以划分为三个部分

  1. 内核:包含VFS
  2. fuse:fuse和VFS交互完成
  3. 用户程序:用户程序跟fuse交互

以一个具体的open文件为例:前提是已经挂载了该文件系统

  • 用户app调用glibc open接口,触发sys_open系统调用(或者手动打开)。
  • sys_open 调用fuse中inode节点定义的open方法。
  • inode中open生成一个request消息,并通过/dev/fuse发送request消息到用户态fuse。
  • fuse调用fuse_application用户自定义的open的方法,并将返回值通过/dev/fuse通知给内核
  • 内核在返回给用户app(或者说用户在界面中看到了打开的文件内容)

FUSE 开发示例


接下来,进入实战环节:

  • Mac OSX 10.14.2
  • 安装 osxfuse :brew cask install osxfuse)
  • clion 2018

从github 上拉取项目:https://github.com/excel-bat/apuebegin.git

将该项目中的chapterRes/fuse-demo
导入到clion中,编译打包,然后跳转到对应的terminal

  • mkdir /tmp/example
  • cd - (跳转到项目目录下的fuse-demo/cmake-build-debug/bin )
  • fuse-demo -f /tmp/example (-f 前台运行)
  • 打开finder,到XXX的MacBook,会多出来一个挂载点
  • 目前只实现了open,效果如下

```
那今天先聊到这,休息下眼睛

123

excel_bat

技术分享

15 日志
5 分类
9 标签
GitHub E-Mail
© 2023 excel_bat
由 Hexo 强力驱动 v4.0.0
|
主题 – NexT.Pisces v7.0.1